Pages

3/31/2012

核桃布朗尼 Brownies with Walnuts

口感綿密的布朗尼沒有重重的化學巧克力醬味
而是滑順香醇的苦甜巧克力豆
上面撒上烘培過的核桃
輕輕的麵香和可可粉的華爾滋
是舌間劃過後讓人愉悅的甜蜜
吃一口 口齒留香
再一口 微笑不止
這就是不只好吃的功力 而是歡愉的幸福時刻!!

---王X寶


Brownies Recipe在這邊:   烘烤前上面加上核桃, 保證更好吃!

3/29/2012

咖啡奶凍蛋糕 Coffee Bailey Cake

咖啡凍蛋糕配上一杯熱拿鐵, 補充咖啡因! (誤)


牛排, 迷迭香番茄與白花椰 Luncheon with daddy


Today's one of those special days that I make lunch meals...other days I make desserts and breads. Why? Because I'm a sweet tooth!  Haha.

I kicked off by pan searing the steak, stick it into a preheated oven at 175 Celsius for 10-12 mins. Meanwhile, boil a pot of water to blanch the cauliflowers.
Use the steak pan, add in tomatoes, some sun dried tomatoes, tomato sauce and some herbs.
Oh, don't forget to season it with some salt and pepper!

平日都是烤蛋糕, 餅乾, 麵包....今天換個口味: 做愛心午餐給老爸

[今日午餐] 嫩煎牛排配上迷迭香番茄和燙白花椰菜

簡單又不輸給外面餐廳的好料理歐!

蘇打餅乾 Crackers -"Polly want a cracker?"


"Polly want a cracker?"


I don't have a pet parrot, but the voice "Polly want a cracker?" always comes up when I make crackers. I guess I watched Treasure Island too many times on TV when I was small.   Hummm...."Yo ho ho and a bottle of rum..." (don't put rum into the recipe!)


(中文食譜在下面)

3/28/2012

Linda's Homemade Bagel 芝麻橘香貝果, 滿滿的堅果與橘皮香


Linda's ultimate homemade bagel!
Packed with Walnuts, Pine nuts, Sesame and Orange Zest.
  Infused with Orange Blossom water.


早餐不知道要吃什麼嗎? 來個自製手工培果吧!

簡單, 健康又少油!
(碎碎念: 12顆培果才加15公克的橄欖油捏)

3/27/2012

訂婚禮盒 Engagement Gift Box


第一份訂單好興奮!!

30個訂婚禮盒, 裡面有六片手工餅乾, 紅絲絨愛心蛋糕還有超實在布朗尼 :)

Happy Engagement!!

3/22/2012

水蜜桃蛋糕 Peach Cake


Fruity Peach and Berries cake....ready to be covered by raspberry mousse!

很久很久以前做的水蜜桃蛋糕, 照片剛在電腦裡面找到.

食譜太久遠不可考.....大家就當純欣賞舊作吧~

如果沒記錯, 這只是半成品. 之後加上覆盆莓慕斯蓋住~

3/18/2012

牛排101 Steak 101

有心想做牛排給男/女朋友吃, 卻不知道怎麼用嗎? 照過來, 參考看看吧~

1.用紙巾把牛排的血吸乾
(下鍋時才不會油四處亂濺)

2. 簡單的用鹽巴和胡椒醃入味, 約15分鐘

3/14/2012

玫瑰花餅乾 Rose swirl cookies

擠花餅乾系列

好久沒更新部落格了...之前生了場大病, 好不容易才好.  體力正在慢慢回復中

測試自己的手感是否不見了: 做擠花餅乾--"假會"擠成玫瑰花形狀

白色情人節快樂!


2/15/2012

Happy Valentine's Day II 餅乾組合


奶油小酥餅夾了 Nutella 巧克力醬, 你儂我儂 甜得化不開~

紅絲絨棒棒糖 Red Velvet Lollipop


為了FAIRY準備的情人節伴手禮, 情人節祝福大家小確幸, 中確幸, 大確幸 全包了!

愛心棒棒糖打上了蝴蝶結還真可愛呢~~~(老王賣瓜) 呵呵呵

1/25/2012

愛心紅絲絨小蛋糕 Red Velvet Hearts


愛心紅絲絨小蛋糕

農曆初三, 狐媚的紅絲絨蛋糕出來勾人. 誘人的鮮紅, 說不出的嬌嫩一併融化在舌尖. 


嬌柔美艷, 像一朵豔紅色的雲


媚意無窮


1/23/2012

松露百菇水波蛋 Stirfry mushrooms w/ poached egg


Watch that egg yolk ooooze out.....omg, heaven!

水波蛋心好軟, 用刀一切, 流心便緩緩流出融入菇群中; 它, 征服了我對美食的慾望.

(English recipe at the bottom)

百菇松露水波蛋
材料:
五種菇類 (香菇, 金針菇, 猴頭菇, 舞菇, 牛肝蕈)
奶油 10g
鹽巴 5g
胡椒 少許
松露油少許

蛋一顆

義大利香芹 (帕西里) 兩根 2 twigs


準備順序:
 1. 首先將牛肝蕈泡水, 讓它軟化出味

2. 將義大利香芹切碎 (留一片漂亮的葉子裝飾)


1/18/2012

奶酪 Panna Cotta


Smooth, silky texture and easy to make...goes great with Strawberry Jam or Cranberry Jam!

<奶酪> Panna Cotta Recipe

牛奶 200g
鮮奶油 200g
糖  40g
吉利丁片 6g 泡水, 擠去水分

1. 把牛奶與鮮奶油一起加熱
2. 將糖加入溶化後, 離火,加入擠去水分的吉利丁片
3. 倒入杯子或是碗內
4. 放入冰箱冷藏約12小時就完成了

------------------------------------------------------------------------------------
Panna Cotta Recipe

Ingredients:
200g Milk
200g Heavy Cream
40g Sugar
6g Gelatin sheet (150 Blooms, soak and squeeze out excess water)

1. Heat Milk and Heavy cream together, do not overboil
2. Add sugar, stir until melted
3. Remove from heat and add gelatin sheet
4. Pour liquid into cups, bowls or martini glasses
5. Refrigerate for 12 hours and serve


6/1/2012 餐會做了變化版本:
中間夾了一層芒果果凍, 上面放巧克力裝飾片與新鮮芒果丁
我做了30份, 可是當天只有來24人....
咦~ 誰多吃了一份?!!!


1/16/2012

草莓果醬 Strawberry Jam


Strawberry Jam adapted from Christine Ferber Jams Recipe: Mes Confitures

草莓季又到了, 每年這時候都會看到路邊都有卡車在賣草莓.

前幾天從市場買到的超甜小草莓, 一口氣買了兩大盒來做草莓果醬

我喜歡吃到整顆飽滿的草莓果醬和酸酸甜甜的檸檬片.

不管是夾土司或是加在奶酪上都很搭, 而且不必擔心有塑化劑或防腐劑!


<草莓果醬>
食譜如下:

1/14/2012

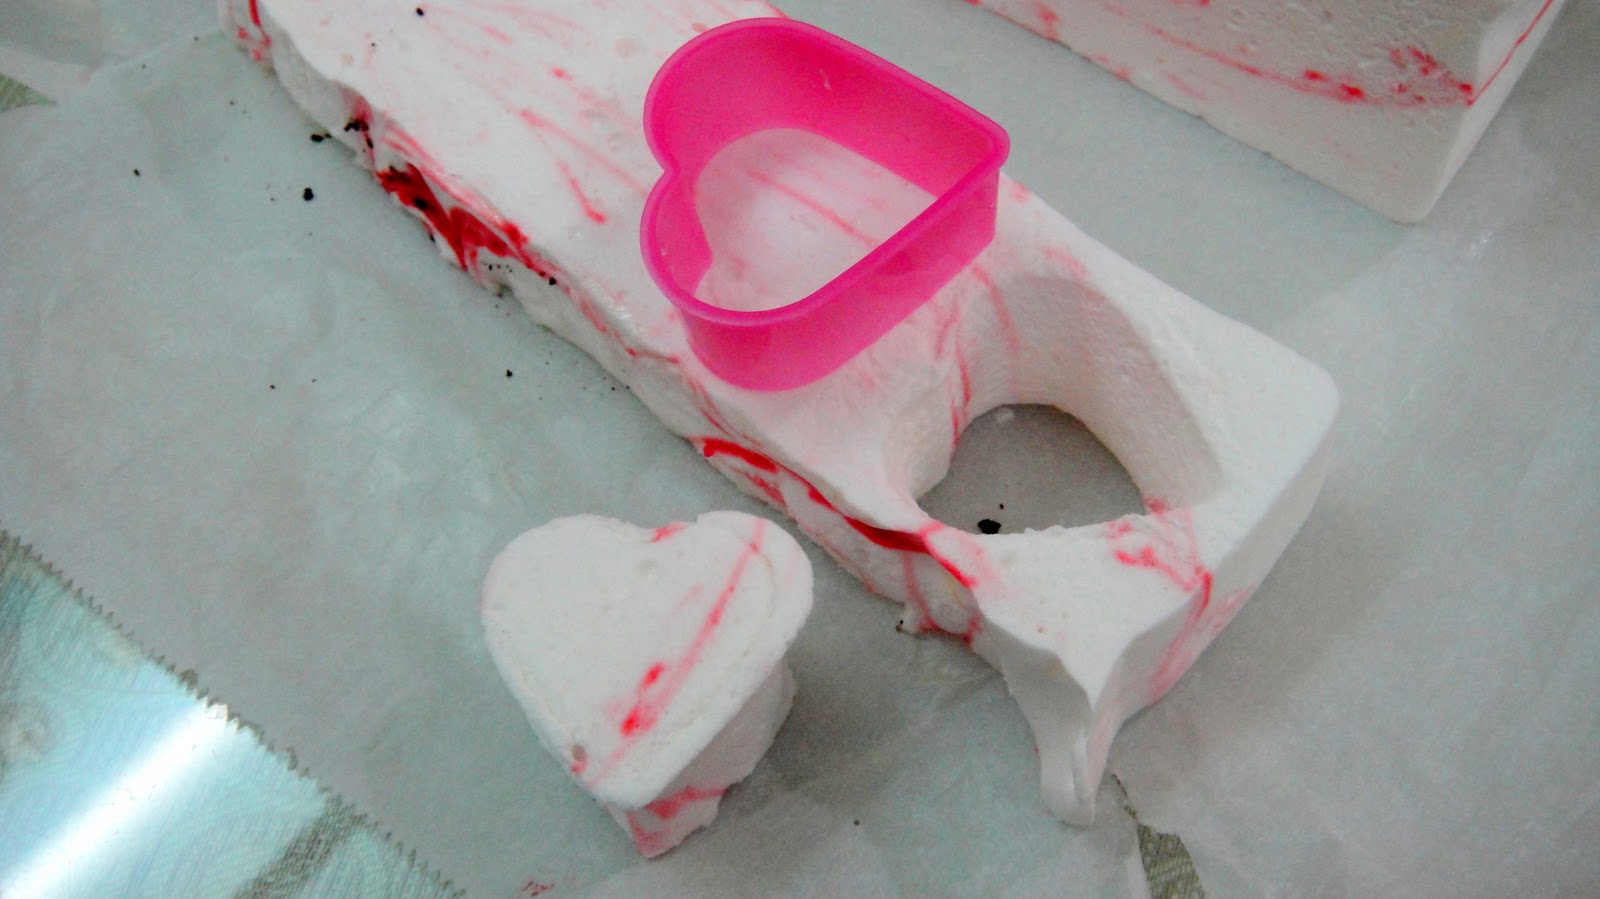
愛心棒棒棉花糖 Marshmallow Lollipop


Adapted from Martha Stewart's Marshmallow recipe


自製愛心棉花糖

材料:
料理植物油 (我用溶化的奶油)
糖 兩杯 約400g
玉米糖漿 1大匙約15g
水 3/4 杯+3/4杯
吉利丁粉 28g
薄荷香精 3/4茶匙 (我用橙花水, 也可省略)
蛋白 兩顆
紅色色素 2茶匙

棉花糖食譜
1. 將八吋方模抹上溶化的奶油, 裁一張大小剛好的烤盤紙, 放入模子內, 也抹上奶油
2. 把糖, 玉米糖漿及水放入鍋子內煮到127度C (或260度F)
3. 把吉利丁粉與另一杯3/4杯的水加熱,攪拌到溶化 (通常我都用飲水機的熱水, 速度比較快)
4. 將蛋白放入到攪拌機內 (KitchenAid Whisk attachment) 打到濕性發泡
5. 把 (2)+(3) 糖漿與吉利丁水混合
6. 攪拌機轉到低速, 把(5)緩緩倒入, 全部倒入後把攪拌機轉到高速, 打約12-15分鐘
7. 攪到白色絲綢狀倒入之前準備好的方模裡面
8. 在上面滴紅色色素, 用牙籤快速拉線就會形成美麗的線條
9. 放置3小時, 用沾過油的刀子切開
10. 用愛心餅乾模切出愛心形狀
11. 串在棒棒糖的棒子上


Ingredients

  • Vegetable-oil cooking spray
  • 2 cups sugar
  • 1 tablespoon light corn syrup
  • 4 packages (1/4 ounce each) unflavored gelatin
  • 3/4 teaspoon peppermint extract
  • 2 large egg whites
  • 2 teaspoons red food coloring

Directions

  1. Coat an 8-inch square pan with cooking spray; line bottom with parchment paper. Coat the parchment with cooking spray, and set pan aside. Put sugar, corn syrup, and 3/4 cup water in a small saucepan. Cook over medium heat, stirring, until sugar is dissolved. Stop stirring; let mixture come to a boil. Raise heat to medium-high; cook until mixture registers 260 degrees on a candy thermometer.
  2. Meanwhile, sprinkle gelatin over 3/4 cup water in a heatproof bowl; let stand 5 minutes to soften. Set the bowl with the gelatin mixture over a pan of simmering water; whisk constantly until gelatin is dissolved. Remove from heat, and stir in extract; set aside.
  3. Beat egg whites in the bowl of an electric mixer fitted with the whisk attachment until stiff (but not dry) peaks form. Whisk gelatin mixture into sugar mixture; with mixer running, gradually add to egg whites. Mix on high speed until very thick, 12 to 15 minutes.
  4. Pour mixture into lined pan. Working quickly, drop dots of red food coloring across surface of marshmallow. Using a toothpick, swirl food coloring into marshmallow to create a marbleized effect. Let marshmallow stand, uncovered, at room temperature until firm, at least 3 hours or overnight. Cut into squares.

1/13/2012

蔓越莓醬 Cranberry Sauce

 蔓越莓醬 -佐烤雞, 配菜, 泡熱飲的好夥伴


新鮮的蔓越莓酸到無法入口, 煮成醬汁好吃又方便!

食譜:
新鮮蔓越莓 340g (洗淨, 瀝乾)
糖 200g
水 200g


1. 準備一個大鍋子, 把蔓越莓, 糖還有水一起放入


2. 燉煮約15-20分鐘後, 濃稠狀時就完成了!


3. 可以直接泡熱開水喝, 配料理 (可以當烤雞, 烤鴨等的沾醬, 帶著清爽的酸味去除肉類的油膩感) , 加在奶酪上也可以

4. 或是用果醬罐裝起來, 包漂漂送人歐
  (記得果醬罐還有瓶蓋都要先用熱水消毒過再裝, 裝好後再次把整個罐子放入熱水中消毒)


鴨胸佐蔓越莓醬 Duck Breast w/ Cranberry Sauce


奶奶託人從宜蘭買了一隻母鴨送我.... 我的媽"鴨", 真的是一整隻鴨!! 連鴨頭都還在!

(以下內容血腥, 不喜者勿入)

請自行點閱, 斟酌使用

1/12/2012

南瓜子薄餅 Pumpkin Seeds Thins


我最喜愛的餅乾之一

<南瓜子薄餅>

香香脆脆的出爐, 咬著滿滿的堅果香.

沒有絲毫的甜膩感, 一片接一片......mmm

而且吃南瓜子對攝護腺好, 是吧?

只要一個大碗, 一個攪拌棒即可完成的簡單小餅乾.

(English recipe at the bottom)

南瓜籽薄餅食譜

溶化的奶油 30g
蛋白兩顆
糖 50g
鹽巴 1/4 茶匙
低筋麵粉 40g
南瓜子 100g


1. 奶油溶化放涼後加入蛋白, 然後拌入糖和鹽巴
2. 攪勻後加入低筋麵粉, 再次攪拌均勻
3. 加入南瓜子, 倒入已鋪好烤盤紙的烤盤,
4. 把麵糊推平
5. 烤箱預熱後烤130度C, 15分鐘
6. 趁熱時切成條狀

----------------------------------------------------------------------------------------------------------
Pumpkin Seeds Thins Recipe:

Butter (melted and cooled) 30g
Egg whites 2ea
Sugar 50g
Salt 1/4tsp
Flour 40g
Pumpkin Seeds 100g

1. Add melted and cooled butter to egg whites, then add sugar and salt to the batter
2. When all ingredients are incorporated, add flour (I used cake flour, but all purpose flour is fine too) and mix until there are no lumps
3. Add pumpkin seeds to the batter, mix and spread on a baking pan that is already lined with baking paper
4. Spread the batter evenly on the baking pan
5. Place into preheated oven at 130 Celsius, bake for 15mins
6. Remove from oven once it is browned and cut into lengthwise pieces